


espcam-secserver is a DIY door security camera built from an ESP32-CAM and a small Python backend.
When a door magnet (reed switch) wired to the ESP32-CAM detects that the door opened, the camera
turns on its flash LED and calls the backend. The FastAPI backend then pulls three snapshots
from the camera, one second apart, and sends them to a WhatsApp contact or group through
Green API.
The repository contains:
app/- the FastAPI backend (runs in Docker).CameraWebServer/- the ESP32-CAM Arduino sketch (based on the EspressifCameraWebServerexample, extended with the door sensor and backend trigger).esp-32-cam-case-model_files/- 3D-printable case files.sequence-diagram/- the flow diagram shown below.
- Features
- How it works
- Hardware
- Firmware setup
- Backend installation
- Configuration
- Green API setup
- API reference
- Security notes
- Troubleshooting
- Development
- Contributing
- License
- Door-triggered capture: a reed switch on GPIO 13 of the ESP32-CAM triggers the capture when the door opens.
- Flash LED: the on-board flash LED (GPIO 4) turns on when the door opens and turns off
4 seconds after the door opens (or when the door closes), but not before the backend request
returns, which can take up to
backendTimeoutMs(10 s). - Three snapshots per event: the backend fetches
/capturefrom the camera three times, one second apart. - WhatsApp notifications: each snapshot is uploaded and sent to a contact or group via Green API, with an optional caption.
- Multiple cameras: the backend uses the caller's IP address as the camera address, so any number of cameras can share one backend.
- Shared-secret authentication: the trigger endpoint requires an
AUTH_TOKEN, compared in constant time. The server refuses to start without it. - SSRF protection: the backend only fetches images from callers on a private or loopback network.
- Credential redaction: the Green API token, instance ID and auth token are scrubbed from the application's log messages (Uvicorn's access log is not redacted).
- Docker support: slim Python 3.12 image, non-root user, built-in healthcheck on
/health. - 3D-printable case: STL files for a wall-mounted case.
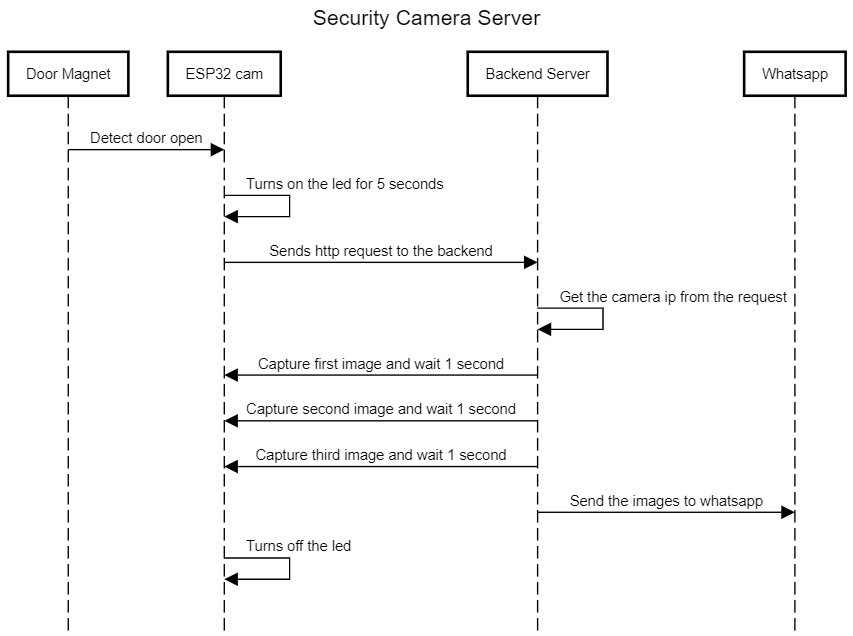
- The door magnet opens and GPIO 13 on the ESP32-CAM reads
HIGH. - The ESP32-CAM turns on the flash LED and sends
GET <backendUrl>with anX-Auth-Tokenheader. - The backend checks the token and takes the camera IP address from the request's source address.
- The backend fetches
http://<camera-ip>/capturethree times, waiting one second after each. - Each captured image is uploaded to Green API and sent to
TARGETwith theMESSAGEcaption. - The LED turns off 4 seconds after the door opens, or when the door closes, but only once the backend request has returned (the request blocks the firmware loop).
The diagram source is in sequence-diagram/camsec diagram.txt
(sequencediagram.org syntax). Note that it says the LED stays on for 5 seconds; the firmware uses
4 seconds (ledDuration = 4000).
- ESP32-CAM, AI Thinker model (the sketch selects
CAMERA_MODEL_AI_THINKER; other boards are defined incamera_pins.hbut require changing the#define). - USB-to-serial adapter (FTDI or similar) to flash the ESP32-CAM, unless your board has a USB programmer base.
- Door magnet / reed switch between GPIO 13 and GND. The pin uses the internal pull-up,
so it reads
LOWwhile the magnet holds the switch closed andHIGHwhen the door opens. - 5 V power supply for the ESP32-CAM.
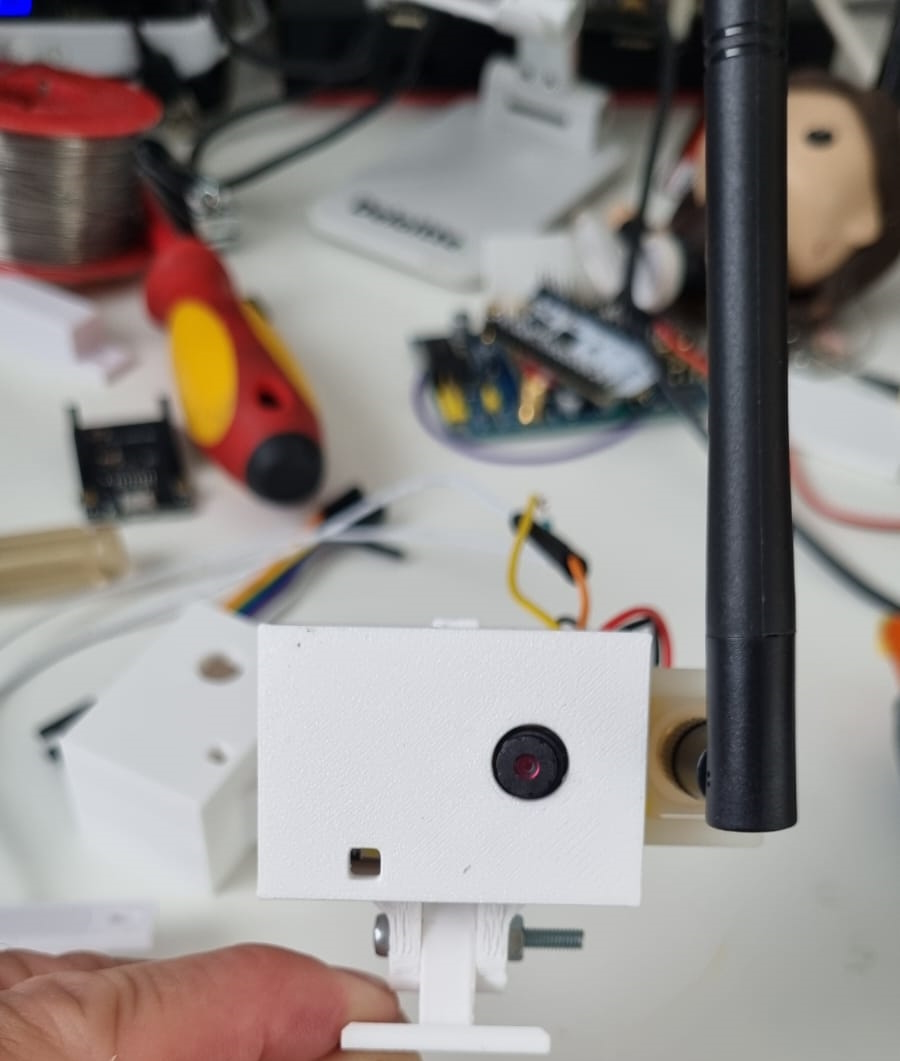
The case is the ESP 32 Cam Case by
Fabian on Printables, released into the public domain. The files are in
esp-32-cam-case-model_files/:
| File | Part |
|---|---|
gehause.stl |
Housing |
deckel.stl |
Lid |
fuss.stl |
Wall mount (foot) |
The model's print sheet (the PDF in the same folder) lists PLA, 0.20 mm layers, a 0.40 mm nozzle, about 22 g of filament and about 2 hours on a Prusa MINI.
-
Install the Arduino IDE and the esp32 board package by Espressif (Boards Manager).
-
Open
CameraWebServer/CameraWebServer.ino. -
Edit the settings at the top of the sketch:
Setting Description ssid/passwordYour Wi-Fi network credentials. backendUrlBase URL of the backend, including scheme, host and port, for example http://192.168.1.100:8000/. With the provideddocker-compose.yaml, the host port is80.authTokenMust match the backend's AUTH_TOKEN.backendTimeoutMsTimeout for the trigger request (default 10000ms).doorPinReed switch GPIO (default 13).ledPinFlash LED GPIO (default 4).ledDurationMinimum time the LED stays on (default 4000ms); it stays on until the backend request returns. -
Select the AI Thinker ESP32-CAM board and the serial port. The sketch folder contains a custom
partitions.csv, which the esp32 Arduino core uses automatically. -
Put the board in flashing mode (GPIO 0 to GND on most boards), upload, then remove the jumper and reset.
-
Open the Serial Monitor at 115200 baud. After connecting, the board prints its address (
Camera Ready! Use 'http://<ip>' to connect).
The camera must be on the same private network as the backend. A DHCP reservation for the camera is not required: the backend reads the camera IP from each request.
The firmware keeps the standard CameraWebServer web interface: the control page and /capture
on port 80, and the MJPEG stream on port 81 (/stream).
Note: the image on Docker Hub (
techblog/espcam-secserver:latestand:0.0.1) was published in August 2024 and predates the current source (for exampleAUTH_TOKEN,/healthand the non-root user). Until a new image is published, build the image locally as shown below.
git clone https://github.com/t0mer/espcam-secserver.git
cd espcam-secserver
docker build -t techblog/espcam-secserver .
Fill in the environment variables in docker-compose.yaml:
services:
  espcam-secserver:
    image: techblog/espcam-secserver
    container_name: espcam-secserver
    restart: always
    environment:
      - GREEN_API_INSTANCE_ID= #Green API Instance Id
      - GREEN_API_TOKEN= #Green API Token
      - TARGET= #Target phone number 972*********@c.us for contact or @g.us for group
      - MESSAGE= #Caption for the image sent
      - AUTH_TOKEN= #Shared secret required to trigger the capture endpoint
      - CORS_ORIGINS= #Optional comma-separated allowed CORS origins
    ports:
      - "80:8000"
Then start it:
docker compose up -dThe container listens on port 8000; the compose file publishes it on host port 80.
docker run -d --name espcam-secserver --restart always \
  -p 8000:8000 \
  -e GREEN_API_INSTANCE_ID=<instance-id> \
  -e GREEN_API_TOKEN=<token> \
  -e TARGET=972XXXXXXXXX@c.us \
  -e MESSAGE="Door opened" \
  -e AUTH_TOKEN=<shared-secret> \
techblog/espcam-secserverpip install -r requirements.txt
export GREEN_API_INSTANCE_ID=... GREEN_API_TOKEN=... TARGET=... AUTH_TOKEN=...
python3 app/app.pyThe Docker image uses Python 3.12.
All configuration is done with environment variables.
| Variable | Required | Default | Description |
|---|---|---|---|
GREEN_API_INSTANCE_ID |
Yes | - | Green API instance ID. |
GREEN_API_TOKEN |
Yes | - | Green API instance token. |
TARGET |
Yes | - | WhatsApp chat ID to send the images to: <phone>@c.us for a contact (international format, digits only, for example 972501234567@c.us) or <id>@g.us for a group. The value is used as-is, so include the suffix. |
AUTH_TOKEN |
Yes | - | Shared secret the camera must send to trigger a capture. Must match authToken in the firmware. |
MESSAGE |
No | none | Caption sent with each image. |
CORS_ORIGINS |
No | empty (no cross-origin access) | Comma-separated list of allowed CORS origins (GET only, no credentials). |
REQUEST_TIMEOUT |
No | 10 |
Timeout in seconds for each image request to the camera. |
PORT |
No | 8000 |
Port the server listens on. Keep it at 8000 in Docker: the image's EXPOSE, HEALTHCHECK and the compose port mapping all use 8000. |
The server exits at startup with Missing required environment variables: ... if any required
variable is empty.
- Create an account at green-api.com and create an instance.
- Link the instance to a WhatsApp account by scanning the QR code in the Green API console.
- Copy the idInstance into
GREEN_API_INSTANCE_IDand the apiTokenInstance intoGREEN_API_TOKEN. - Set
TARGETto the chat that should receive the images (see the table above).
The backend uses the whatsapp-api-client-python
SDK: it uploads each image with uploadFile and sends it with sendFileByUrl.
FastAPI also serves interactive documentation at /docs (Swagger UI) and /redoc, and the
schema at /openapi.json.
Called by the ESP32-CAM when the door opens.
Authentication: the X-Auth-Token header, or the token query parameter, must equal AUTH_TOKEN.
curl -H "X-Auth-Token: <shared-secret>" http://<backend>:8000/The request must come from the camera itself: the backend fetches images from
http://<caller-ip>/capture.
| Status | Meaning |
|---|---|
200 "OK" |
Request accepted and processed. Returned even if some or all captures or sends failed; check the logs. |
400 |
The client address is missing or invalid. |
401 |
Missing or wrong token. |
403 |
The caller is not on a private network. |
503 |
AUTH_TOKEN is not configured. |
Returns {"status": "ok", "version": "1.0.0"}. Used by the Docker HEALTHCHECK.
- Always set a long, random
AUTH_TOKEN. The same value is compiled into the firmware. - Prefer the
X-Auth-Tokenheader (the firmware uses it). A token passed as?token=can end up in access logs. - Traffic between the camera and the backend is plain HTTP. Keep both on a trusted LAN and do not expose the backend to the internet.
- The camera's own web server (control page,
/capture,/stream) has no authentication. Anyone on the network can view the camera. - The firmware stores the Wi-Fi password and
authTokenin the sketch source. Do not commit your filled-in copy. - The backend only fetches from private or loopback addresses, and redacts Green API credentials and the auth token from its application log messages (not from Uvicorn's access log).
- Container exits at startup with
Missing required environment variables: setGREEN_API_INSTANCE_ID,GREEN_API_TOKEN,TARGETandAUTH_TOKEN. 401 Unauthorized:authTokenin the firmware does not matchAUTH_TOKEN.403 Camera must be on a private network: the request reached the backend from a public address. The camera must call the backend directly over the LAN.- No images arrive /
Failed to fetch imagein the logs: the backend fetches from the request's source address. If something between the camera and the backend changes that address (a reverse proxy, NAT, or a Docker setup that does not preserve the client IP), the backend asks the wrong host for images. Call the backend directly; if Docker hides the client IP, try host networking. - The camera's Serial Monitor shows a negative HTTP response code: the backend only answers
after it has captured and sent all images, which can take longer than
backendTimeoutMs. The backend still finishes the job; increasebackendTimeoutMsif you want a clean response code. Camera init failed: check the board model selected in the sketch and the camera ribbon cable.
app/app.py                     FastAPI backend (single file)
CameraWebServer/               ESP32-CAM Arduino sketch
esp-32-cam-case-model_files/   3D-printable case (STL + print sheet)
sequence-diagram/              Flow diagram (PNG + source)
images/                        README images
Dockerfile, docker-compose.yaml
VERSION                        Image version used by the Docker workflow
Run locally:
pip install -r requirements.txt
AUTH_TOKEN=dev GREEN_API_INSTANCE_ID=... GREEN_API_TOKEN=... TARGET=... python3 app/app.py
GitHub Actions workflows (in practice both run manually; docker-image.yml is also set to run after a "Create Release" workflow that does not exist in this repository):
- Docker Build (
docker-image.yml): buildslinux/amd64andlinux/arm64images and pushestechblog/espcam-secserver:latestand:<VERSION>to Docker Hub. - Publish to GHCR (
publish-ghcr.yml): buildslinux/amd64,linux/arm64andlinux/arm/v7images and pushes them toghcr.io/t0mer/espcam-secserver.
Issues and pull requests are welcome at github.com/t0mer/espcam-secserver.
This project is licensed under the Apache License 2.0.
The case model is by Fabian on Printables and is in the public domain.