A simple code write on Python to create an autonomous vehicle looking for the best path to go from point A to point B
To make it run properly, you will need to download somes depencies and programs.
First, you will need Anaconda
Go on https://www.anaconda.com/download/#windows and click on "Download" button of Python 3.7 version (You can always use the last version of Python)
Once the installer has downloaded, launch it and start following the instructions.
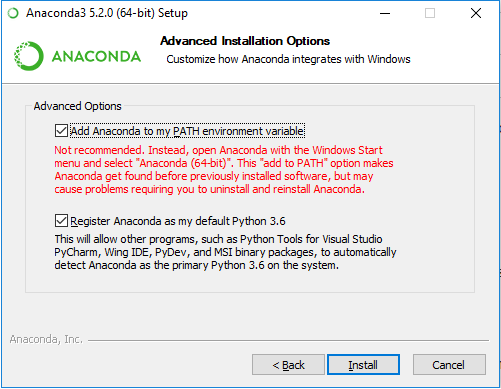
/!\ Warning: You must check the "Add Anaconda to my PATH environment variable" option, as on the screenshot below:
Go on https://www.anaconda.com/download/#macos and click on "Download" button of Python 3.7 version (You can always use the last version of Python), then follow the installation instuctions.
Go on https://www.anaconda.com/download/#linux and follow the same instructions as above.
Then, go on your terminal and type sh Anaconda3-5.2.0-Linux-x86_64.sh after navigating to the folder where you downloaded Anaconda, then follow the installation instructions.
Go on https://pytorch.org/ then choose your os
We have previously downloaded Anaconda, so choose Conda
Python: Choose Python 3.7
Cuda: If you have a CUDA compatible GPU, you can choose the associated CUDA version. If you don't have one or don't know, choose None. You will then get the commands to type in the terminal just below.
In the Start Menu, search "Anaconda Prompt", launch it as an Administrator, then on this command prompt, you can copy the commands that you received below.
Just open a command prompt and paste the command you received below.
It's recommended to create an Anaconda environment beforehand. An environment makes it possible to install modules specifically for the project on which to work, in order to avoid conflicts between different versions.
To create an environement, type thoses commands: conda create --name artificialintelligenceaz python=3.7 anaconda conda activate artificialintelligence conda install pytorch-cpu torchvision-cpu -c pytorch spyder
The first line creates the environment in Python 3.7
The second line activates the environment. You will need to activate the environment each time you resume your work in this project.
The third line depends on your OS (Mac, Linux, or Windows), use the PyTorch site to get the exact command.
The fourth line launches Spyder IDE. It is important to launch it from the console to stay in the environment you just created.
Go on Kivy website here -> https://kivy.org/#download
You can type on the command prompt: python -m pip install --upgrade pip wheel setuptools python -m pip install docutils pygments pypiwin32 kivy.deps.sdl2 kivy.deps.glew python -m pip install kivy.deps.gstreamer python -m pip instal l kivy.deps.angle python -m pip install kivy python -m pip install pygame
In the command prompt: brew install pkg-config sdl2 sdl2_image sdl2_ttf sdl2_mixer gstreamer pip install Cython==0.28.3 pip install kivy pip install pygame
In the command prompt:
sudo add-apt-repository ppa:kivy-team/kivy
sudo apt-get install python3-kivy
sudo apt-get install -y \`python-pip \``build-essential \``git \``python3 \``python3-dev \``ffmpeg \``libsdl2-dev \``libsdl2-image-dev \``libsdl2-mixer-dev \``libsdl2-ttf-dev \``libportmidi-dev \``libswscale-dev \``libavformat-dev \``libavcodec-dev \``zlib1g-dev``sudo pip install --upgrade pip virtualenv setuptools``pip install Cython==0.28.2``pip install kivy``pip install pygame`Have fun !